
The intense Florida sun is relentless. Thinking about house window tinting? It’s one of the single most effective upgrades you can make to your home. The afternoon light turns your living room into a sauna, you have to squint to fight the blinding glare on your TV, and you’ve noticed your new sofa or hardwood floors fading. As a 30-year-strong Jacksonville company, we’ve helped thousands of your neighbors reclaim their comfort with professional window tinting for homes.
A common question we get is, “How do I measure my windows?” Maybe you’re looking for a rough idea for budgeting, or perhaps you’re a dedicated DIY-er ready to tackle the project yourself. Whatever your reason, accurate measurements are the single most important step for a flawless, professional-grade installation.
An incorrect measurement is the starting point for a failed project. Here’s our expert, step-by-step guide on how to measure your windows the right way—and a few pro-tips on what to look for beyond the numbers.
Why Accurate Measurements Are So Critical
Window film, especially high-performance 3M™ film, is a precision product. It’s designed to bond directly to the glass, creating a seamless barrier. An incorrect measurement, even by just a quarter of an inch, can compromise the entire installation.
This leads to several problems when tinting windows:
- Unsightly Gaps: The most obvious issue. A film cut too small will leave a “light gap” around the edge of the glass. This gap not only looks unprofessional but it allows heat and UV rays to stream right through, defeating the purpose of the tint.
- Bubbling and Peeling: A film that’s cut too large is even worse. It will ride up onto the window frame or rubber seal. This prevents a proper bond, allowing air and dirt to get underneath. Within weeks, you’ll see bubbling, peeling, and lifting at the edges.
- Wasted Material and Money: High-quality tinted window film is a significant investment. Cutting a piece incorrectly means it has to be thrown away, and you have to start over. This is especially painful on large picture windows or sliding glass doors.
A perfect fit ensures the film bonds directly and securely to the glass, creating a complete seal that delivers 100% of the heat-blocking, glare-reducing, and 99.9% UV-protection benefits you’re paying for with your residential window tint.
Pre-Measurement Prep: Don’t Just Measure, Inspect
Before you even unhook your tape measure, take a moment to inspect your windows. This is a step amateurs skip but one that professionals never do. Applying tint to a compromised window can trap moisture or even worsen existing damage.
Get up close and look for:
- Hairline Cracks: Look in the corners and along the edges. A small, hard-to-see crack can spread under the pressure and temperature changes of a tint application.
- Delamination or Fogging: Do your double-pane windows look “foggy” or “milky” inside? This indicates the seal between the panes has failed, and moisture is trapped inside. Window film cannot fix this and should not be applied to a failed unit.
- Chips or Gouges: Any significant chips in the glass can create an air pocket under the film, which will never cure out.
- Seal Condition: Check the rubber or caulk seals around the glass. Are they cracked, peeling, or pulling away? A poor seal can compromise the tint’s adhesion.
If you find any of these issues, it’s best to have the window assessed or repaired before proceeding with tinting.
Once you’ve inspected, clear your workspace. Remove any furniture, curtains, blinds, or decorations from the window and windowsill. You’ll need unobstructed access to get a true, level measurement.
Essential Tools for the Job
You don’t need a full workshop, but having the right tools is crucial.
1. A Steel Tape Measure: This is non-negotiable. A flexible “floppy” cloth tape (like one from a sewing kit) can sag over a long window, giving you an inaccurate reading. A 25-foot rigid steel tape is your best friend.
2. Notepad and Pen: Don’t try to remember the numbers. Write down every single measurement as you take it.
3. A Helper (Highly Recommended): For large picture windows or sliding glass doors, it’s almost impossible for one person to hold the tape measure perfectly level and taut from one side to the other. A second person makes this a simple, accurate task.
4. A Simple Diagram: You don’t need to be an architect. Just draw a simple layout of your home or each room and label the windows (e.g., “Living Room – Left,” “Kitchen Slider,” “Master Bedroom – Arch”). This way, your list of measurements makes sense later.
The Core Step-by-Step Measurement Process
For any standard rectangular window, the process is simple and straightforward.
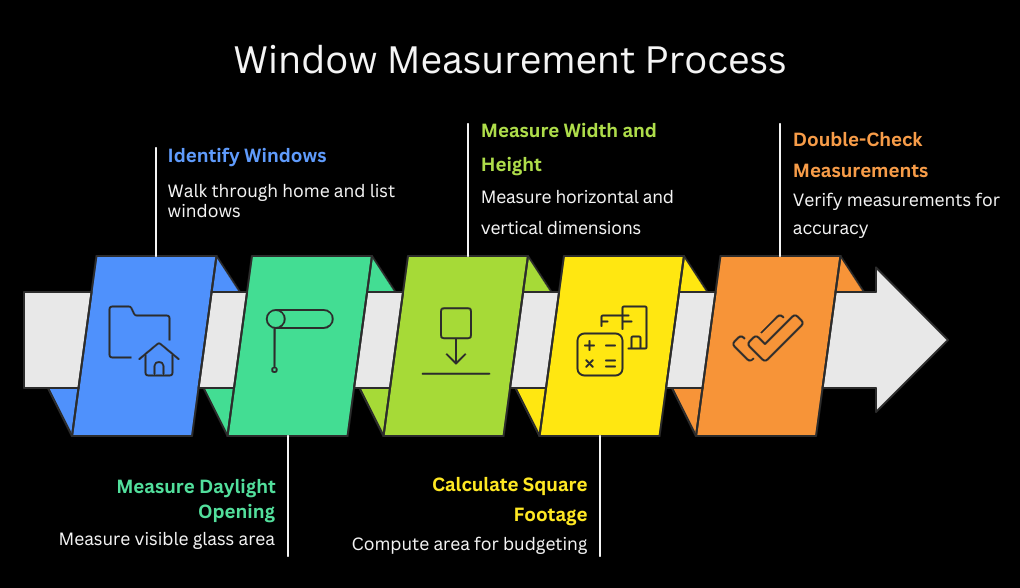
Step 1: Identify and List Your Windows
Start by walking through your home and creating that master list on your notepad or diagram. This organization is essential and prevents you from missing that one small bathroom window.
Step 2: Measure the “Daylight Opening” (Glass Only)
This is the most important rule and the most common mistake. Do not measure the window frame, the molding, or the rubber gasket. Window film is applied only to the visible glass.
We call this the “daylight opening.” You will be measuring from the inside edge of the frame on one side to the inside edge of the frame on the other.
Step 3: Measure Width, Then Height
For every window on your list, you need two measurements:
Width: Measure horizontally from the left edge of the glass to the right edge.
Height: Measure vertically from the top edge of the glass to the bottom edge.
For maximum accuracy, we recommend measuring to the nearest 1/8th of an inch. Don’t round up or down. Precision is key.
Step 4: Calculate Square Footage (For Budgeting)
This step is helpful for estimating material costs. The formula is simple:
1. Multiply the Width (in inches) x Height (in inches) to get the total square inches.
2. Divide the Total Square Inches by 144 (since 144 sq. inches = 1 sq. foot).
Example: For a window that is 48 inches wide and 60 inches tall:
48″ x 60″ = 2,880 square inches
2,880 / 144 = 20 square feet
Step 5: Double-Check Everything (The “Measure Twice” Rule)
The old carpenter’s adage “measure twice, cut once” has saved more projects than any other rule. After you’ve measured all your windows, go back to the beginning and measure them all a second time.
Compare your new numbers to your first list. They should match exactly. This simple 10-minute check catches simple errors—like transposing 48″ as 84″—and saves you a massive headache.
A Pro-Tip: Exact Size (for a Quote) vs. DIY Margin
This is a crucial distinction.
- If You’re Calling Us for a Quote: We want the exact glass size (your “daylight opening”) measurements. Our software and experts will take those numbers and calculate the required film, including our own precise margins for your residential window tinting project.
- If You Are a Dedicated DIY-er: You must add a “buffer margin.” You will cut your film oversized—typically 1/2 inch to 1 inch larger on all sides. The film is then “wet-applied” to the window, and the excess is trimmed off directly on the glass with a special blade for a perfect, micro-beveled edge.
How to Measure Tricky & Non-Rectangular Windows
This is where many projects go wrong. Here’s how to handle “specialty” windows.
- Double-Hung Windows: These windows have two separate sashes (the parts that move up and down). You must measure the top and bottom sashes separately. They often look identical, but a 1/8″ difference is common and will ruin the fit.
- Sliding or Gliding Windows: Treat these just like double-hung windows. Measure each sliding pane of glass as its own individual window.
- Casement and Awning Windows: These are typically simple rectangles. Just measure the glass area. The cranking mechanisms don’t affect the measurement.
- Arched or Curved Windows (Palladiums): These beautiful windows require a few steps.
1. Measure the straight rectangular portion at the bottom first (Width x Height).
2. For the arch, find the exact center of the window’s width.
3. Measure from the top of the rectangular portion up to the highest peak of the arch in the center.
4. If the arch isn’t a “perfect” semi-circle, the safest method is to create a template. Tape a large piece of craft paper to the glass and trace the exact curve.
- Bay and Bow Windows: These are not one giant window. They are a series of individual windows joined at angles. You must measure each pane of glass individually and label it on your diagram (e.g., “Bay – Left,” “Bay – Center,” etc.).
Common Measurement Mistakes to Avoid
As professionals with 30+ years of experience, we’ve seen every possible mistake. Avoid these common pitfalls:
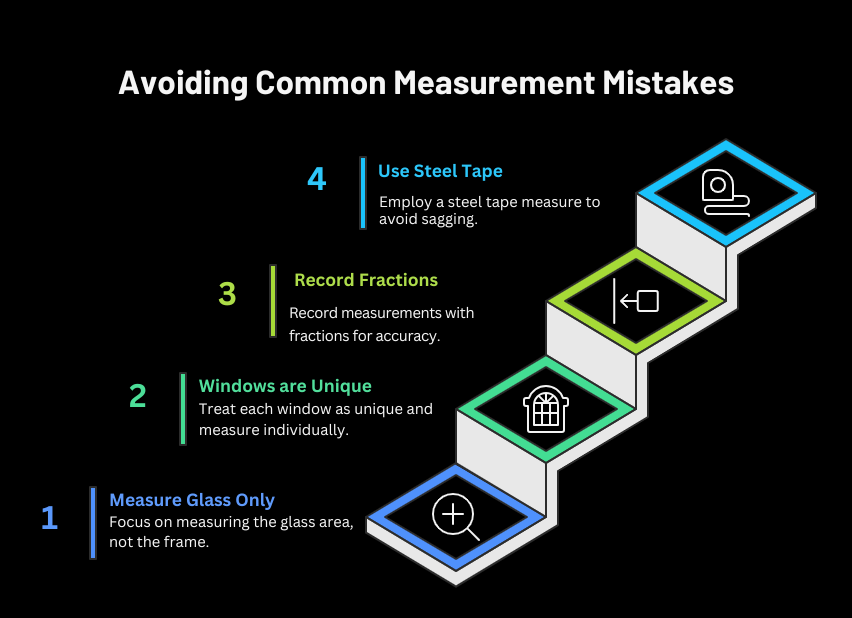
1. Measuring the Frame: We have to say it again. Do not measure the frame. Glass only.
2. Assuming Windows are Identical: Never measure one bedroom window and assume the other three are the same. They almost never are. Measure every single window individually.
3. Rounding Your Numbers: Don’t round 35 5/8″ to 36″. That 3/8″ gap will be a glaring strip of light. Be precise and write down the fraction.
4. Using a “Floppy” Tape Measure: A cloth or vinyl tape will sag in the middle of a wide window, giving you a measurement that is shorter than reality. Use a rigid steel tape.
The Jacksonville Factor: What a Tape Measure Won’t Tell You
A successful, long-lasting tint job in Jacksonville involves more than just measurements. Our local climate presents unique challenges.
- Our Infamous Humidity: Window tint “cures” by evaporating the water-based application solution. In Jacksonville’s high humidity, this process takes significantly longer than in a dry climate. You may see small, hazy water pockets for a few days or even weeks. This is normal! They will evaporate. We adjust our process for this, but it’s a key part of setting proper expectations.
- Intense UV and Heat: The very reason we tint our windows means we must use a high-quality, durable film. Cheap, dyed films will turn purple, bubble, and fail within a year or two under the Florida sun. This is why we exclusively trust 3M™ films, which are warrantied against this.
- Coastal Salt Air: If you live near the beaches, that fine salt spray must be meticulously cleaned from the glass before installation to ensure proper adhesion.
- HOA and Condo Rules: Many Jacksonville-area HOAs have specific rules about the darkness or “reflectivity” of tinted house windows. As local experts, we are familiar with these rules and can help you choose a film (like 3M™ Prestige) that is virtually clear but blocks enormous amounts of heat, keeping you in compliance.
Preparing for Your Professional Installation Day
Once your measurements are confirmed and you’re on our schedule, a little prep makes the day go smoothly:
- Clear the Area: Please move any furniture, breakables, and electronics at least 3-4 feet away from the windows.
- Clear the Windowsills: Remove all plants, photos, and decorations.
- Secure Pets: We love them, but a pet running underfoot can be a safety hazard for them and our installers.
- Dust/Clean Floors: A quick vacuum or sweep of the area reduces the amount of dust that can get airborne and stick to the film. (Don’t worry about deep-cleaning the glass itself—we do a multi-stage, surgical-grade cleaning of the glass right before we apply the film.)
The All Spec Sun Control Difference: Precision Guaranteed
This guide gives you the knowledge to measure your windows accurately, but as you can see, a truly professional job involves much more. A professional installation from our team takes all the risk and guesswork completely off your plate.
When you schedule a free, no-obligation consultation with us:
- We use precision laser and digital tools for exact measurements.
- We inspect your windows for any pre-existing issues you may have missed.
- We bring our 30+ years of expertise to help you select the right 3M window film for your specific problem—whether it’s extreme heat, fading, glare, or you’re looking for window film for privacy.
- We guarantee our work. The fit will be perfect, with no gaps, bubbles, or peeling, and it’s all backed by a comprehensive 3M™ warranty.
Ready to Solve Your Sun Problem for Good?
When you search for “tint windows near me” or the best “window tint shop near me” in Jacksonville, you’ll find All Spec Sun Control. That’s because for over 30 years, we’ve been the trusted local experts dedicated to quality, precision, and customer satisfaction.
Don’t let the Jacksonville sun dictate your home’s comfort and energy bills for another season. If you’re ready to see how our films can transform your home, give us a call.
Contact All Spec Sun Control today at (904) 745-5930 or fill out our online form to schedule your free, in-home house window tinting consultation.
FAQs
Q 1: What happens if I measure wrong?
Ans: An incorrect measurement is the most common reason for a failed tint job. If you cut the film too small, you’ll have permanent, unsightly gaps that let in heat and light. If you cut it too large, the film will peel, bubble, and lift at the edges because it can’t bond properly to the glass.
Q 2: My windows look hazy right after installation. Is this normal?
Ans: Yes, this is perfectly normal and expected. The “haziness” or small water pockets are part of the curing process, where the application solution evaporates. In Jacksonville’s humidity, this can take anywhere from a few days to a few weeks. The film will become perfectly clear once cured.
Q 3: Will my HOA allow tinted house windows?
Ans: This is a valid concern. Many HOAs have rules against dark or “shiny” reflective films. However, modern films like the 3M™ Prestige Series are virtually clear, non-reflective, and block an incredible amount of heat. These are often fully compliant with even the strictest HOA rules. We can help you select the right one.
Q 4: Can I apply window film to my double-pane (dual-pane) windows?
Ans: Absolutely. High-quality residential window tinting films are designed to be safely applied to modern double-pane windows. The only time we would not apply film is if the window’s seal has already failed (which you can spot as “fogging” or moisture trapped between the panes).
Q 5: What’s the difference between the measurements I take and the ones you take?
Ans: When you measure, you’re getting the “daylight opening” (exact glass size), which is perfect for getting a budget quote. When our professionals measure, we use laser tools for precision and also assess the window’s condition, frame, and seals to plan for a flawless installation. For a DIY project, you would need to add a margin to your measurements, but for a professional quote, the exact glass size is all we need.